
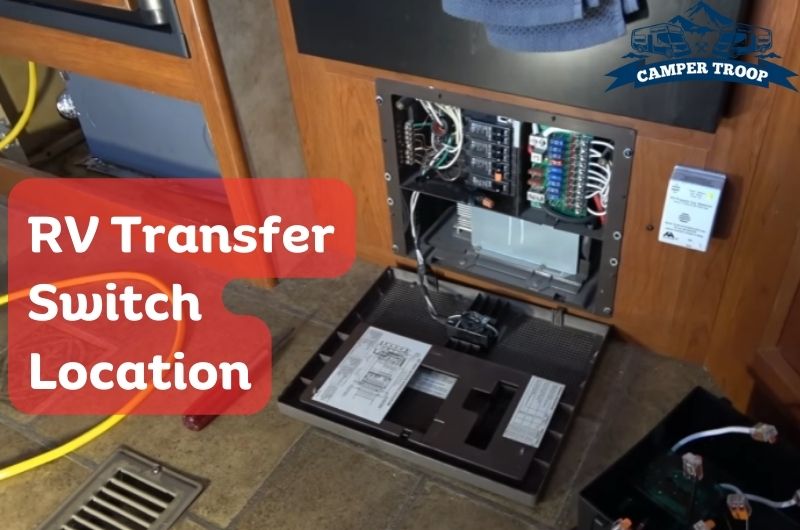
RV Transfer Switch Location: Don’t Hover Around to Find It!
The main task of your RV’s transfer switch is to supply power to your RV, either from the shore or the generator. Due to different mechanisms of RVs, most people find it troublesome to find the RV transfer switch location either during replacement or new switch installation.
Typically, the RV transfer switch box stays in the breaker panel, but on some models, like the 3051, the transfer switch is seen with the water pump and filter. Moreover, in some models, you might also find it under the bed, or near your generator.
As confusing as it may sound, we are here to help you with the details. So, let’s find out where your RV’s transfer switch is hiding!
What Is an RV Transfer Switch?
An RV transfer switch is an electrical device used to manage the power source for various appliances and systems within a recreational vehicle (RV).
Typically, there are three types of transfer switches- manual, non-automatic and automatic.
The difference between manual and automatic transfer switches is that while manual ones need to be switched manually, automatic ones do that on their own due to their logic control system.
And non-automatic ones are somewhat in between, which requires your intervention but not entirely.
Your automatic transfer switch directly switches to the second power mode whenever your RV needs it.
You don’t have to plug your shore cord into the 4×4 box to use the onboard generator with it.
Both the shore cord and the generator go into the ATS switch directly, and the switch switches according to the needs.
Read Also: RV Slide Out Relay Location: Everything You Need to Know!
Where Is an RV Transfer Switch Located?
Depending on the model and year of your RV, the location of your transfer switch may vary. Typically, the switch is found prior to the breaker panel.
But some models may have it on the passenger side immediately behind the rear wheels, like in the 3051 RV.
Some users have also found the transfer switch near the generator. You might find it easily if you can locate your shore power cord.
Usually, if you can see the shore power cord, it means that the automatic transfer system is hidden anywhere near that.
Another place to look is under the drawer in the bathroom vanity. You might need to remove the screws to get to the box.
Again, we even found the switch located under the bed next to the AC distribution panel on our 2015 Sunseeker 2500TS and 2007 Gulfstream 280GF. This is surprising because we had to remove the plywood bed cover to get to it.
We have seen a similar situation with the Forester 2861 as well. Here, the switch box was under the mattress board, following the fuse box.
Read Also: Where Is the Air Governor Located & How Does it Work?
Types of RV Transfer Switches
You will find three basic types of RV transfer switches. But remember that the types might also have some subtypes that you might need to look out for. Here are the three types of transfer switches found in RVs:
Manual Transfer Switches
These switches rely on manual operation. You need to pull a lever on the side of the transition switch, and it will direct the connector to move to another power source. Typically, these switches are less costly than the automatic ones.
Non-Automatic Transfer Switches
This type of switch falls between manual and automatic transfer switches. In this, you don’t need to use a lever like the manual switches, but it has an electronically operated mechanical device that starts the connection. All you need to do is press the button and start operating the switch.
Automatic Transfer Switches
Now that we have had all the talk about the automatic switches, They have an automatic control system that works on its own without your intervention.
This makes the whole thing effortless, and you don’t need to worry about pressing a lever or a switch to start it up.
Read Also: RV 12-volt System Not Working When Plugged In: How to Fix?
Installing an RV Transfer Switch
If you have bought a new transfer switch for your RV, let us assure you that it’s not that big of a deal to install that. Here are a few steps that you can follow:
First, locate the transfer box area inside your RV as per our previous instructions.
Take the transfer switch box and punch the punchouts to create the holes. You will need two holes at the top and one at the bottom. These holes will be used to connect the wiring.
Now mount the transfer box in the desired location. If you don’t already have the holes, drill to make holes in the right points of your RV, measuring the box’s mounting points.
Once you are done, connect the wiring and use screws to attach everything in place. Ground the transfer switch and test to check whether everything is okay or not.
Final Words
Automatic transfer switches are effortlessly useful for RVs. But you need to properly clean them occasionally to ensure that they are offering good service. If you still can’t find your RV transfer switch location, try reaching out to a professional.
Read Also: How to Reset Power Outlet Without Reset Button?

Zayan is an accomplished author and a go-to expert for all things RV and camper-related. With a passion for adventure and a knack for problem-solving, he has spent years exploring the open road and fine-tuning his knowledge of recreational vehicles.
Zayan’s writing is a testament to his expertise, offering readers practical solutions to common RV dilemmas. Whether it’s troubleshooting mechanical issues, optimizing space, or planning the perfect road trip, Zayan’s insightful advice and engaging storytelling make him an invaluable resource for both seasoned travelers and newcomers to the world of RVing.

![How To Maintain TPO RV Roof? [Complete Guide]](https://campertroop.com/wp-content/uploads/2023/01/How-To-Maintain-TPO-RV-Roof-768x509.jpg)